After a long time with all my RC stuff, I got interested to do something with the RaspberryPI. I am using one already a media center but that was not really a challenge.
Motivation was to solve a problem we have at some of our customer sites. Here in a tropical environment, working air conditions in server rooms are vital. At some customer sites, a not well functioning aircon caused issues with server hardware. To prevent that in the future, a temperature monitoring would be great. We are monitoring our customers already with Nagios. The idea was to purchase a network capable thermometer that we can hook up with Nagios.
There are ready made solutions, but to my surprise really expensive! Another thing that would be nice to have, are remote switchable power plugs. To at least to be able to switch off/on devices using low amps like a PBX or a wireless access point.
I was sure that all this can be done with a RaspberryPi. What we need is a temperature sensor and some relay board, saw some for Arduinow which should do the job. Quickly I discovered the DHT22 sensor, which provides temperature and humidity data!
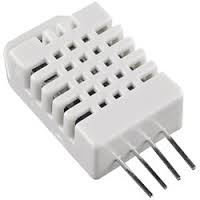 I found them at eBay for $4.68 a piece with free shipping. I ordered two and got to my surprise two little boxes and in each of them 2 DHT22. So I got four over all. Nice!
For the relay I found two channel boards with opto coupler, selling at eBay for less than $4. I ordered two as well, but this part of the whole project will be covered in a separate blog posting. For now I want to concentrate on the temperature and humidity monitoring.
For the biggest part of the project, connecting and reading the DHT22 sensor, exists already a tutorial with some programs:
http://learn.adafruit.com/dht-humidity-sensing-on-raspberry-pi-with-gdocs-logging/overview
The wiring is actually quite easy. I can recommend to use a cable from an old USB device, you will need only 3 wires and one of them is for data, hooked up in our example to Raspberry’s GPIO 4.
I am using the Adafruit_DHT driver, which is nothing more than a little C program, to retrieve the data from the sensor. I did a small modification to the code, that it is easier to parse its output. The modified version can be downloaded here. Also I had to change the Makefile, I was not able to compile the code after updating Raspbian on my RaspberyPI.
This is the use of the little shell program to read the data from the sensor. I changed the output to “temperature|humidity“:
sudo ./Adafruit_DHT 2302 4
31.2|60.5
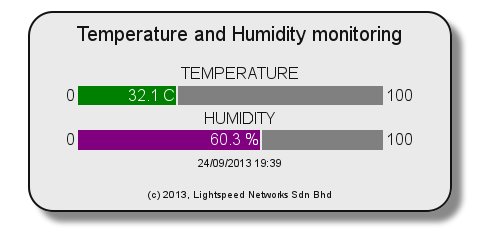
To make these reading web accessible I wrote a little PHP script, which executes “Adafruit_DHT” and parses its output. With a little bit of inline CSS I even formatted it nicely and get an attractive output:
$systemcall="/usr/bin/Adafruit_DHT 2302 4";
echo "<html><head><title>Temperature & Humidity ".date('d/m/Y H:i', time())."</title></head><body>";
ob_start();
passthru($systemcall);
$retval = ob_get_contents();
ob_end_clean();
$data=explode("|", $retval);
echo "<table width='100%'><tr align='center'><td>";
echo "<div style='border:2px solid; border-radius:25px;box-shadow: 10px 10px 5px #888888;padding: 10px;width:400px;background-color:#EAEAEA;'>";
echo "<span style='font:Arial;font-size:20'>Temperature and Humidity monitoring</span><br \><br \>";
if($data[0] > 0) {
    echo "<table padding='0'>";
    echo "<tr><td colspan='4'><center>TEMPERATURE</center></td></tr>";
    echo "<tr>";
    echo "<td>0</td><td align='right' width='".($data[0]*3)."' bgcolor='green'><span style='color:white;'>$data[0] C</span></td>";
    echo "<td width='".(300-$data[0]*3)."' bgcolor='grey'></td><td>100</td>";
    echo "</tr></table>";
    echo "<table padding='0'>";
    echo "<tr><td colspan='4'><center>HUMIDITY</center></td></tr>";
    echo "<tr>";
    echo "<td>0</td><td align='right' width='".($data[1]*3)."' bgcolor='purple'><span style='color:white;'> $data[1] %</span></td>";
    echo "<td width='".(300-$data[1]*3)."' bgcolor='grey'></td><td>100</td>";
    echo "</tr>";
    echo "<tr><td colspan='4'></td></tr>";
    echo "<tr><td colspan='4'>";
    echo "<center><span style='font:Arial;font-size:11'>".date('d/m/Y H:i', time())."</span></center>";
    echo "</td></tr></table>";
} else
    echo "No data. Please try again";
echo "<br \><span style='font:Arial;font-size:10'>(c) 2013, Lightspeed Networks Sdn Bhd</span>";
echo "</div>";
echo "</td></tr></table";
echo "</body></html>"
You need to copy Adafruit_DHT into the corresponding path and my check the permission. You can add the S Flag (chmod +s /usr/bin/Adafruit_DHT) to make it run permanently with superuser permissions. Not the most elegant way, but the simplest.
The next part of the project was, to collect the data every 10 minutes and store it in a database.
For that purpose a second PHP script was created, executed every 10 minutes from cron.
#crontab
0,10,20,30,40,50 * * * * root php /var/www/dht22/deamon.php >>/var/log/dht22
function connect_db()
{
   $server="localhost";
   $dbname="templogging";
   $uid="templog";
   $pwd="mypass";
   $conn = @mysql_connect($server, $uid, $pwd);

   if(!$conn)
        die("Unable to connect to the database.");

   $select = mysql_select_db($dbname, $conn);

   return($conn);

}

$conn=connect_db();

$systemcall="/usr/bin/Adafruit_DHT 2302 4";

ob_start();
passthru($systemcall);
$retval = ob_get_contents();
ob_end_clean();
$data=explode("|", $retval);

if($data[0] > 0) {
    echo "Temperature: ".$data[0]."C|";
    echo "Humidity: ".$data[1]."%\n";
    $sql ="INSERT INTO log (temperature,humidity) VALUES ($data[0], $data[1])";
    $rs=mysql_query($sql, $conn);
    if (!$rs) die("MYSQL: ".mysql_error($conn)."<br><b>$sql</b>");
} else
    echo "No data. Please try again";
So the first parts of the project are done. Whats missing is the Nagios script and something to use the data which are stored in the database. This will be an interesting tool to look for trends. My plan is to write a multi plattform application with Lazarus, displaying the data in graphs.
I will update my blog once this project is further progressing.
Pingback: The magic of SQL ← Lincade.org
Hello guy
I´m student and want work with Temperature and Humidity with RaspberryPi, but can´t get a temperature and Humidity with this code “Adafruit DHT Driver (modified)”, this code not read a data of sensor, and not work, you have any idea?
thanks
Hi, I would guess for a wiring issue to your sensor. You can try the original code from the Adafruit website, link is provided in the article. Holger
Hi, i am trying to use your code, i can get the T° and Humidity with the modified adafruit code, but can’t get the monitoring, i put the modified adafruit in the same path /usr/bin/Adafruit_DHT, give the permissions, the result is the windows and “echo” everywhere, i miss something….
Thank’s for your work, and hope you can give me a hand !