Fixing the ESCs
Time to get the ESCs fixed to the frame and install the flight controller and propellers. The ESCs are just held onto the frame with a little bit of double sided tape and some wire straps.

Simple but effective.

Nice and tidy! But later we have to touch the connections of two motors again. Two of them are rotating in opposite directions and to achieve that, we will flip two wires.

So here are all 4 “servo” wires from our speed controllers. We need to hook them up to the flight controller, not the receiver. Depending on input and flight situation, the flight controller will increase or decrease the speed of certain motors. Thats the magic it does, with it’s microcontroller and gyros.
Installation of the flight controller
My initial plan was to use the space below the top plate for the battery, a 2200 mAh 3s would snug in tightly.

But I didn’t like the idea of having the flight controller without any protection on top of the battery. Also it was a very tight fit with the battery. If I would use a battery with higher C rating, it wouldn’t fit in. So I decided to move the battery to the bottom of the quadcopter. The kit came with a nice velcro strap and I will make use of it.

So this will be the place for the battery. That’s a lot better and I am sure the way its supposed to be!
After becoming clear about battery placement, the place for the flight controller was identified. All cables are already where we need them, so we need to get it into the spot with some mounting pads, self made from 6 layers of double sided foam tape. Due to the nature of the flight controller I am using (amended HK KK V2.1 board), the board is in flight direction a bit thicker. So I made the mounting pad on the front one layer thinner.

Here we can see the bottom of the flight controller, all t he wires and the little red board are not standard. The red board is a accelerometer, which is neccesary to have autolevel on our quadcopter. The board was also extended with some serial line I/O, that way we connect to the MultiwiiConf software to configure and check it. But later I will talk more about it.

The flight controller is mounted, not all wiring connected yet. Looks great, doesn’t it? No?! Well, in these sort of problems I keep on running. You thought you planned your project really well, but then… I thought about getting my dremel tool out of the cabinet and “taking care of the issue”. But I didn’t like the idea of damaging the top plate. This flight controller will be replaced one day by something else. I just want it to use for testing the platform and later move on to something with even more features. With the latest KK board I recommended in Part 1, the HK KK2.0, you wouldn’t run into a space issue here.

These nylon nut and bolt extensions are leftovers from my first quadcopter project ever. The unfamous Hobbking wooden frame. It came with plenty of nylon nuts and bolts. Good that I rarely throw something.

So here is the flight controller already wired to the receiver, only the ESC connectors need to be placed onto the right motor outputs.
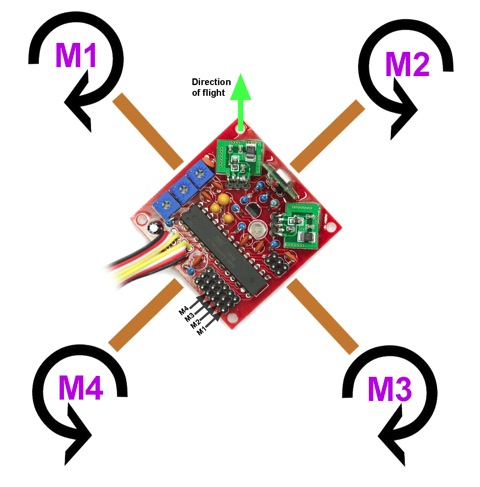
And in this diagram we get two vital informations. Which of the propellers should spin into what direction and how the ESCs need to be connect to the M1 – M4 outputs on the flight controller.

Now we can finish the wiring and I also added a battery monitor. The grey cable is just temporarily there, its to connect the flight controller to the computer. Unless the setup is finished, it better stays there. But it will be removed, once the quad is tuned in nicely. This is a good oppotunity now to calibrate the ESCs and check if the motors are compensating movements correctly. Also the direction of the motors need to be checked, from two of them we will need to flip two wires, to have them spin opposite. After that, we can proceed and mount the propellers. These multcopters are not toys! Avoid to do testing with mounted propellers. Some thought they knew what they are doing, but ended up in the emergency room of the nearest hospital. These are flying meat grinders! Please be careful.
Propeller Installation

I managed to buy four of these 3mm alloy propeller adapters and also the replacement motor arrived in time. So all we need to do, is mount the props and we are done! I decided to use slow fly propellers and not the ones in the picture. But I didn’t notice, that the packages of slow fly props I ordered with the kit, always come with 4 pieces rotating in the same direction. The pack shown in the picture comes with three CW and three CCW instead. I bought a green and a black pack… With the plan to place the green props in front and the black in the back. So this was not possible. I would need one green pack in CW and one in CCW. But instead I got only two pack with 4 green each in CCW and 4 black in CW… Will rectify that with the next order, but whatever color – hey, it will fly!

So thats how it looks. I thought about cutting the main shafts down, to get the propeller adapters very close to the motor bell. In case of a crash, the risk is a lot lower to bend the shaft then. But nobody seems to do that and the shaft is with 3mm diameter of good steel really strong. So I left it like that.


Tadaa! Thast’s the outcome of all efforts. A nice and tidy quadcopter which hopefully flies well. What I can say is, that I am impressed about the quality of the frame. Despite it was so cheap, the fiberglass compoments are really thick and incredibly strong. Same goes for the alloy arms. Soon a video of the maiden flight will follow!
The flight controller
For the flight controller I am using the Hobbyking KK V2.1 board as earlier mentioned. Today more and more flight controller with a decent price popping up. In the past months these boards were the most affordable way to get into that hobby. It comes with three piezo gyros and a ATMEL microcontroller. The V2.1 of this board got the ATEML 168PA microncontroller with 64 KB of flash. These boards are widespread and other incarnations from other manufacturers are available as well. The firmwares have evolved and some can be squeezed into the small ATMEL and others not. So bigger flash = more flexibility in terms of firmware.
The fimrware I am using here is called NeXtCopter Plus. The development has stopped already and I used this board months ago in my DJI F450 frame with limited success. I like the idea of changing the KK 2.1 board and adding new functionality like autolevel and MultiwiiConf. The accelerometer I managed to get through ebay and there is an excellent thread from the author of NeXtCopter on the rc-groups board you can find here.
This firmware gives excellent stability and its fun to see the sensor working in MultiwiiConf on your computer. So it got some “coolness”, but today it is smarte to use the new KK2.0 board with display, MEMS gyros and accelerometer. Its a breeze to setup and you don’t have to solder an hours on your board, like with this project. But if you are the DIY type and got some old KK boards lying around, it might be fun to give it with this some new life. I also bought a serial bluetooth module, to hook the quadcopter up with my mobile or do the configuration wireless from the notebook. But I haven’t tried anything with it yet, which might change with my future plans.
Future Plans
It turned out at the maiden flight, that this platform flies incredibly stable. The motors seem to suit very well to the frame and I am positively surprised. I will enjoy the aircraft a while as it is, but the roadmap is already set. As soon as the MultiWii Pro board with GPS becomes available again in the Hobbyking store, I will order one. It also comes with magnetic compass and barometric sensor, besides MEMS gyros and accelerometer. It can run MegaPirates NG and with that, you get a complete GPS solution, capable of flying waypoints completely unattended. Something where you usually have to pay hundreds of dollar.
For the X550 frame, is a camera mount available for about $12. Its from strong glass fiber and attaches to the outside of the two large center plates. Looks really robust and will also be added with the new FC. With that it not only looks like a real drone.
I built my first quad with this X550 frame in Nov 2012. I’m using DT700 (700kv)motors from HobbyKing with 11X4.5 or 12X4.5 slow fly propellers and currently RCTimers APM2.5 Clone for an FC. I had a CRIUS AIOP installed at first. I use 3200 3s or 5000 3s mah batteries mounted on the bottom with the velcro strap.
I used the same power distribution board but removed the bullet connectors and soldered on deans connectors.
Some notes on my experience:
The motors I used have many holes in the mount but none of them match up with the x550 holes. I ended up using 4 zip ties to secure the frame to the mount which works well in crashes since the zip ties break allowing the motor to flex when hit.
Also, I had to drill holes in the plate to mount the APM2.5 board due to the X550 not having pre-drilled holes for its rectangular form factor.
Lastly, I believe this board is great for a beginner but once you get into adding sensors and accessories like telemetry, bluetooth, OSD (on screen display), GPS, sonar, optical flow, voltage detection, etc, you run out of room to mount things in a tidy fashion quickly. This is the situation I am currently in.
The frame is really light, sturdy, and has stood up to some crashing and banging.
Hi HolgiB.
I was almost done to purchase from Hobbiking the X550 frame when I found your blog, and I have read eveything carefully.
I have learnt a log about “what motor” “what propellers”, etc.
I would like to have MultiwiPro controler, and FVP with my Gopro2.
I’m a little confused about flashing the ESC. Is that different (from yours) to Multiwi?
Can wou give some about this?
Regars
Manuel
(sorry for “my” English, because I’m porguguese).
Hi Manuel,
flashing of the ESC remains exactly the same. Doesn’t matter what flight controller you are using. But I would always recommend to flash them. It gives you a lot better response.