It was a few month ago when I saw the Trifecta Mini quad at least 8 weeks prior its release. Hobby King did a promotion tour across Australia and also did a stop in Penrith, which is just about 25 KM from my place. This was the rare occasion getting hands onto a HK product before you pay money for it.The frame looked well designed and the tail mechanics rock solid. So weeks later, when it showed up in the store I ordered it immediately with all the other necessary bits.
Based on my experiences with the Mini Quad, I was sure to use the Acro NAZE 32 flight controller, Afro 12A ESCs and also the DYS 1408 2300kv motors. All components turned out to be a great choice. Especially with the NAZE32 flight controller I am in love now. It performs in a different league compared to KK 2.x or the Multi Wii Pro I am running with MegaPiratesNG. Don’t waste your time here with a KK 2.0, it is hard to fit into the frame and the Naze outperforms it 20 times. A perfect choice here in terms of fit and performance is the Naze together with the 90 degrees connectors. I don’t know why Hobbyking tries to promote this with the HK Pilot Mega controller. For me this frame is not a logical choice to become a UAV.
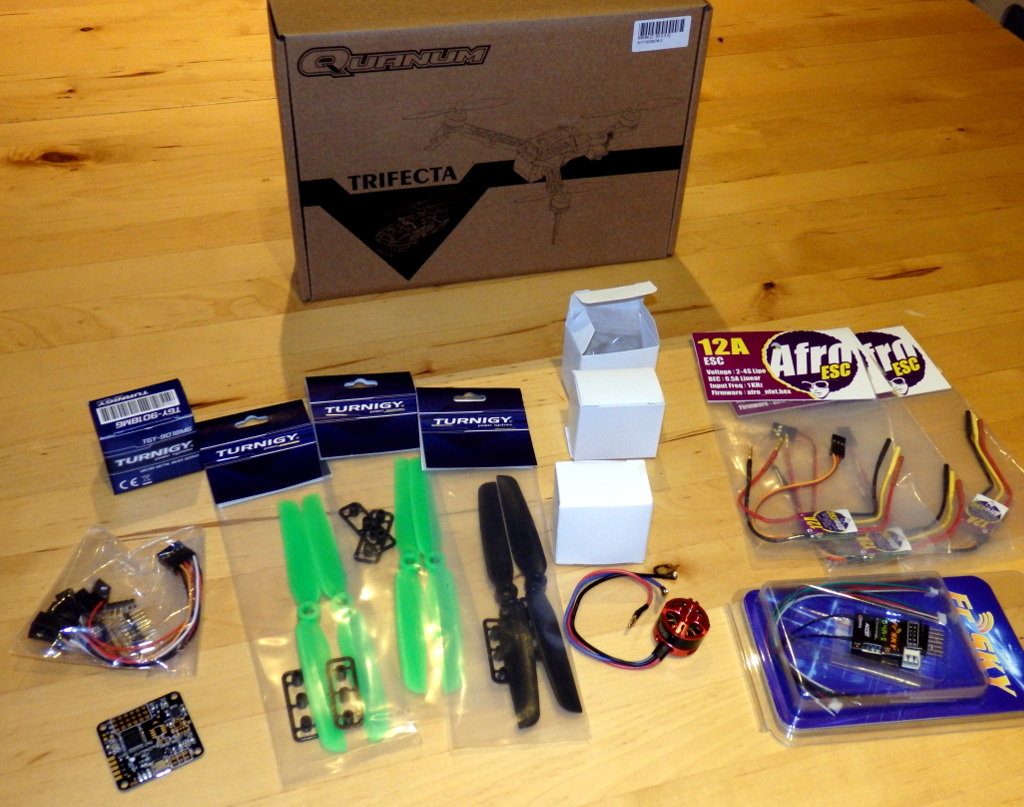 But lets get to the interesting stuff. Here is my shopping list:
- Quanum Trifecta Frame
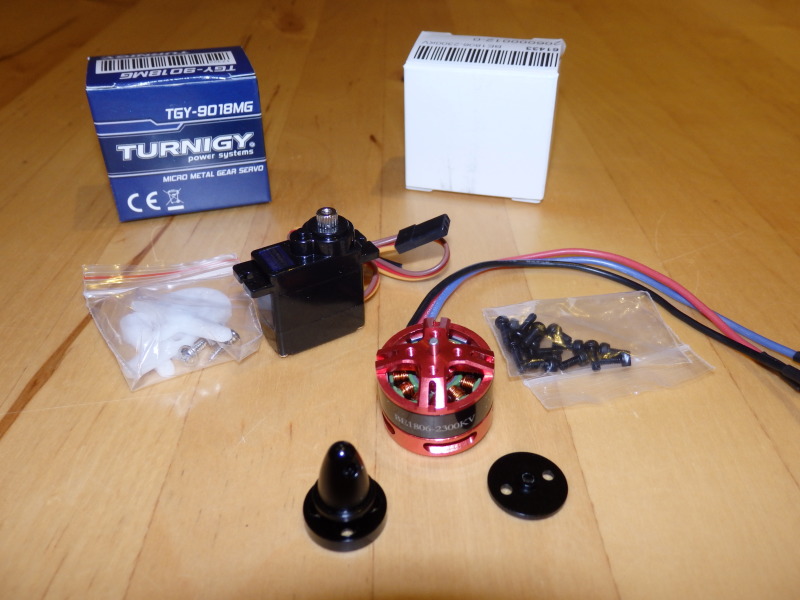
- 3 x DYS BE1806 Motors
- 3 x Afro 12A ESC
- Afro Flight Naze32 Flight Controller
- TGY 9018 Servo
- 2 x Gemfan 6030 Propellers
- Alternatively for the propellers (they are mounted T-Style):
- 2x 6020 Carbon Fibre Props (sligthly less efficient that the Gemfan 6030ies)
- 2x 7024 Carbon Fibre Props (not tested these)
The Naze 32 linked is the one, where you have to solder the connectors yourself onto it. For some of the connections (e.g. to the receiver) you don’t want to use any connectors at all. Better solder the wires directly onto the board. Well there is not much space on this little Tri, but you will see how nice everything will go together and how tidy it can look.
 Something you should already have in your drawer or need to order otherwise are theses accessories:
In addition, I also ordered a small receiver that fits my transmitter (FrSky Taranis) and I am using 1300 mAh batteries. There is one 1500 mAh battery in the store, that is more flat than the 1300 I am using. My Tri is doing a ‘belly landing’ due to that. The one shortfall in terms of construction is the length of the landing gear legs.
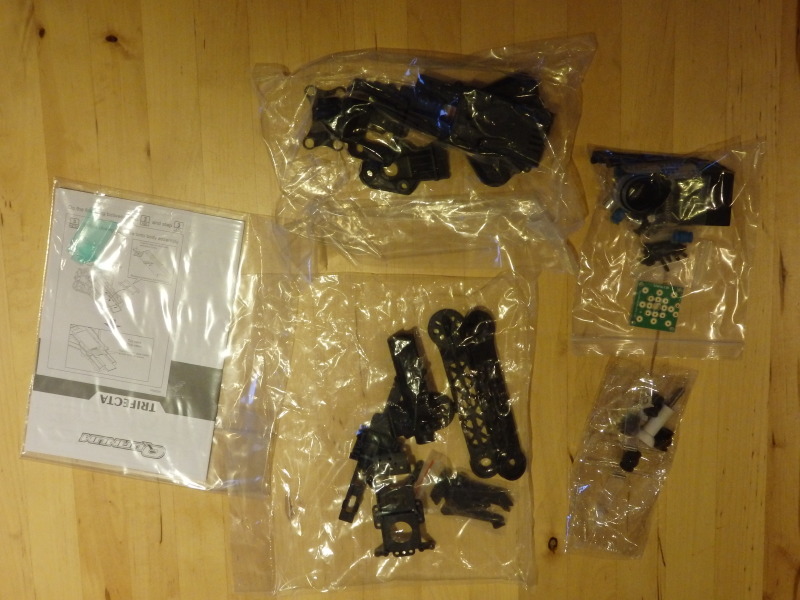 The kit comes with an assembly manual which makes it really easy to put it together. But I was surprised to see the amount of plastic parts. Almost feels like building a Heli ;-).
Together with the kit you will get a little square power distribution board a Mobius and Go Pro Hero 3 mount. Even some zip ties and double sided tape is there.
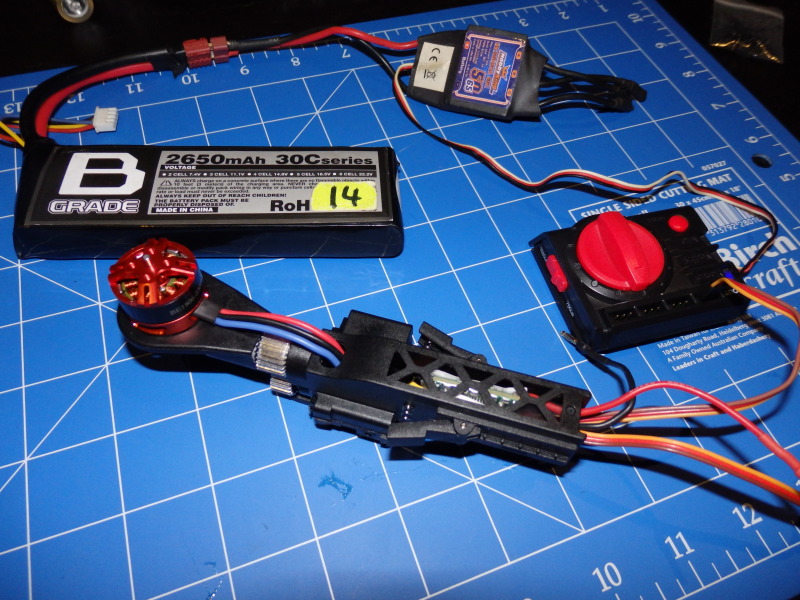
The assembly starts with the two arms. The wires from the motor and ESC are way too long of course. I had to bring the ones from the motors down to about 2cm and the ESC wires to about 1cm. The red and black power cables are just fine. The signal wires from the ESCs are exactly at the right length and will go nicely to the front of the frame. Advantage of the Naze is, that the connector for the signal wires pointing towards the front of the Tri. When you pull them through the body on the front, they fit easily into the connector and there is not much wire left. The motors fit well to the stock holes of the arm, but I recommend to use some tiny washers (don’t forget thread locker). Otherwise you might risk that one gets lose. The heads of the bolts that come with the motors are not very big and the material of the arms feels a bit elastic (soft). Keep in mind that it is not carbon fibre.
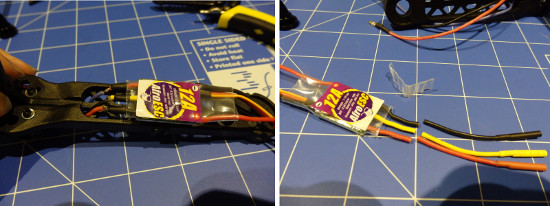 The tail ESC is fitted into the tail arm. There is a small space, where the Afro 12A ESCs easily fits in.
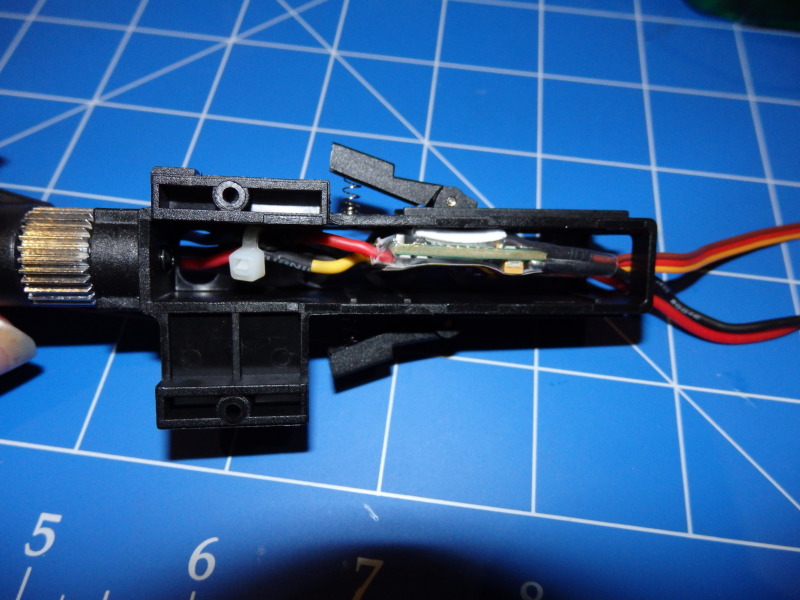
 You need to make sure, that enough cable is left to ensure that the motor can move sufficiently to the left and right. With the help of some double sided tape it will stay in place. The tail servo is also mounted onto the arm, the Turnigy 9018MG was HKs recommendation and it fits percetly (like probably any other 9g servo). But the tricky part was to get the damn servo wire into the spot where the ESC is installed and still to be able to get the cover on it. I used a servo tester to center the servo before I installed it. Remember that all screws that go into metal, need to be secured with thread locker – especially these for the tail mechanic should be secured!
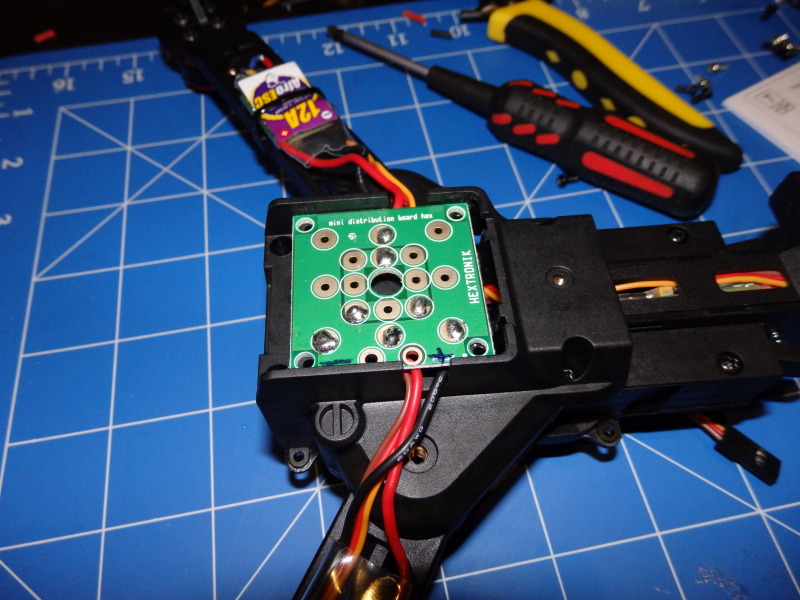 After all arms are finished, its time to join all elements together and connect the ESCs to the power distribution board, that comes already with the kit. All signal wires from ESCs and the tail servo go easily through the frame and will come out of the to of the frame. Just make sure that the folding mechanism still works and no cables are in the way or too short.
If you want to use the battery voltage alarm, you need to solder one extra cable to the power distribution, that then will be connected to the power monitoring port of the Naze32.
 I mounted the flight controller just with the double sided tape that came with the kit. I soldered the pins for the ESC connectors and for telemetry/voltage on the board. It is probably the best to only use the ESC 90 degrees ones and for the rest to solder the wires on the Naze as mentioned earlier. Same way I did for the cable that will go to the receiver on the bottom of the picture. You can also see that all the ESCs and the servo will fit so well with not much excess wire.
In one of my drawers I found an old MTK GPS, it was a spontaneous decision to hook it up with the Naze. So if you are wonder, thats what the yellow/white pair of wires is for. To mount the GPS on top of the cage I just used some hot glue.
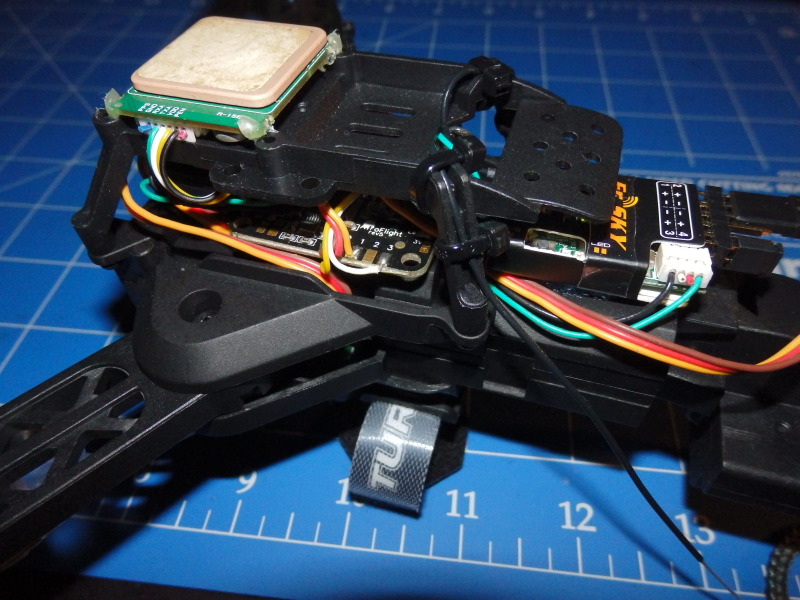 This is how it all looks complete. The receiver is really tiny and fits so well here. Drawback is that it blocks the access to the USB plug of the Naze. As workaround I mounted the receiver with velcro. So whenever I have to connect the Naze to my computer, I can move the receiver a bit to get access. The two antenna wires on each side are going through the rear pillars of the cage. Not sure if it was meant to be like this, but it seems to work well.
It flies really well and I must say its more fun than my mini quad. I am happy with the choice of motors, with this setup it almost feels overpowered. But in the next stage I plan to get this mini Tri FPV ready and I ordered already some components for that.
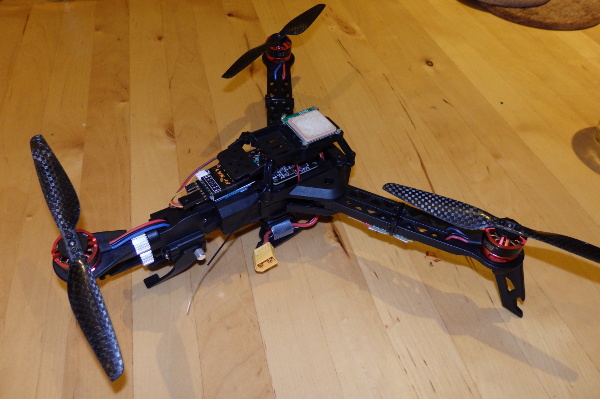
Picture of the Trifecta with 6020 ‘Carbon fibre style’ propellers. They are less effective than the plastic ones. Thought about trying the 7024 listed on top.
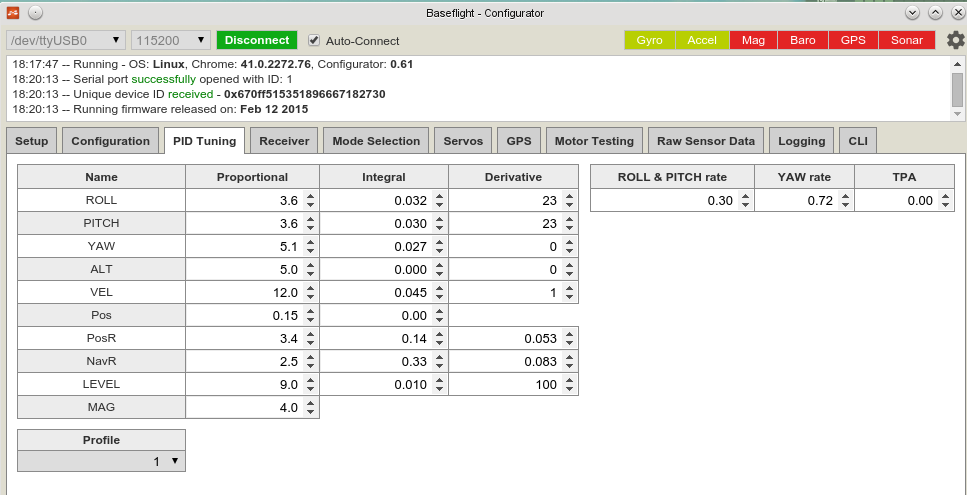 These are my PID settings that work well for me with this setup.
Hi HolgiB!
I saw your post on http://www.rcgroups.com/forums/showthread.php?t=2319688&page=135
and decide to look at your side. Nice website and even nicer built of your Trifecta.
Mine arrived yesterdy and is built with 12a Afro ESC and Mystery 2009-1200. Flight Controller will be HKPilot Micro with GPS and OSD.
I am having a hard time deciding where to place the GPS Antenna as many people wrote that it has to be placed higher than you did.
Does your FC & GPS work with the GPS Antenna beeing so low or did you lift it a bit higher for better performance.
Trifecta is my first multi copter as I am a fixed wing guy and I am having a hard time where to place my D8R-IIPLus and all the GPS FC and OSD stuff (and FPV).
Kind regards
Alex
Hi Alex,
I haven’t really used my GPS yet. Just did a few tests to see if it would get a fix and it does! Here in Australia are a lot less satellites in the air than in other places in the world. I wouldn’t be to worried about that.
There is a shop in the US, the sells a micro-sized version of the MinimOSD. Already got one and plan to put that into my Trifecta. Do you use additional BEC to power it? I would also get rid of the D8R-IIPlus and replace it with a D4R. You should be able then to place the different electronics in the same places like I did.
Holger
Hello Holger,
I have instant gps lock now with my gps beeing mounted on a post 3cm over the upper deck of the Trifecta.
Will try how it works beeing mounted directly on the deck. But right now my big D8R II Plus receiver is mounted on the deck, until I get my new X4RSB delivered.
I like the Trifecta a lot and am surprised by its thoughness. Around 40 Lipos flown with many crashes including prop los in 20m altitude. No arm borke, tilt mechanism still in order, folding mechanisem front and back still working flawless. Maybee that is because I fly over lawn and crop fields and not over concrete ground. Not even one broken prop so far.
Right now I am getting a feel for it and trying acro mode (HKPilot micro).
Thank you for posting the PID:s I have been pulling my hair with my Trifecta which is pretty close to your build and now after copying your PID:s I got it very close to tuned 🙂
Happy to hear that they work for you too! I switched later to ‘CleanFlight’ and it has an Auto Tuning feature. The Tri is now even more locked in! Worth to give it a try.
Hi, i came across your article while searching online for more info on this frame. May i know can i use 1806 2280kv motors because i have a few lying around on my bench. Also can i use my old naze32 FC that is solderd with verticle pins instead of 90 degree pin? Will there be enough room clearance for the FC if it is soldered in Verticle and not 90degree pins?
Regards,
Allan